UPI 102: The Transaction Cycle

Shravan Shandilya
Engineering at Setu
8 Aug 2021 — PRODUCT — THE OTHER SIDE

In this article, we are learning about India's Unified Payments Interface. A four-year-old payment scheme that has been accounting for 40-45% of digital payments across India. In December 2019, Google recommended the Federal Reserve to follow the model of UPI for the design of FedNow.
It is a 3 part series.
Part 1: We covered the background and basics. We learned about the different participants and their roles in the UPI ecosystem.
Part 2 (this article): We take a deep-dive into UPI by tracing a UPI transaction from the beginning through the end.
Part 3: We will look at settlements and understand how money exchanges hands.
Let’s dive right in.
Registration#
The journey towards UPI starts with the registration. The user downloads one of the payment apps based on personal preference. After installing the app, the user’s phone number will be verified with the help of an OTP. The payment apps use the official UPI SDK (or the common library) to generate the device fingerprint and store it in their databases for verification in the future. The device fingerprint acts as the possession authentication factor.
The user will be asked to create a unique UPI ID. The unique UPI ID will act as the user’s payment address to send and receive payments in the future.
As we saw earlier, every payment app has a tie-up with an acquiring bank (except BHIM). They make a REST API request to their acquiring bank to create a new UPI VPA that the user wants.

There is no single standard API interface for the interaction between payment apps and acquiring banks. Every bank has their own API interface.
Additionally, the payment apps might also store a mapping between phone numbers and the UPI IDs to make their UX better. Such a mapping allows them to offer features like send money to someone just by knowing their phone number.
Here’s a snapshot of databases after the creation of UPI ID for the new customer.

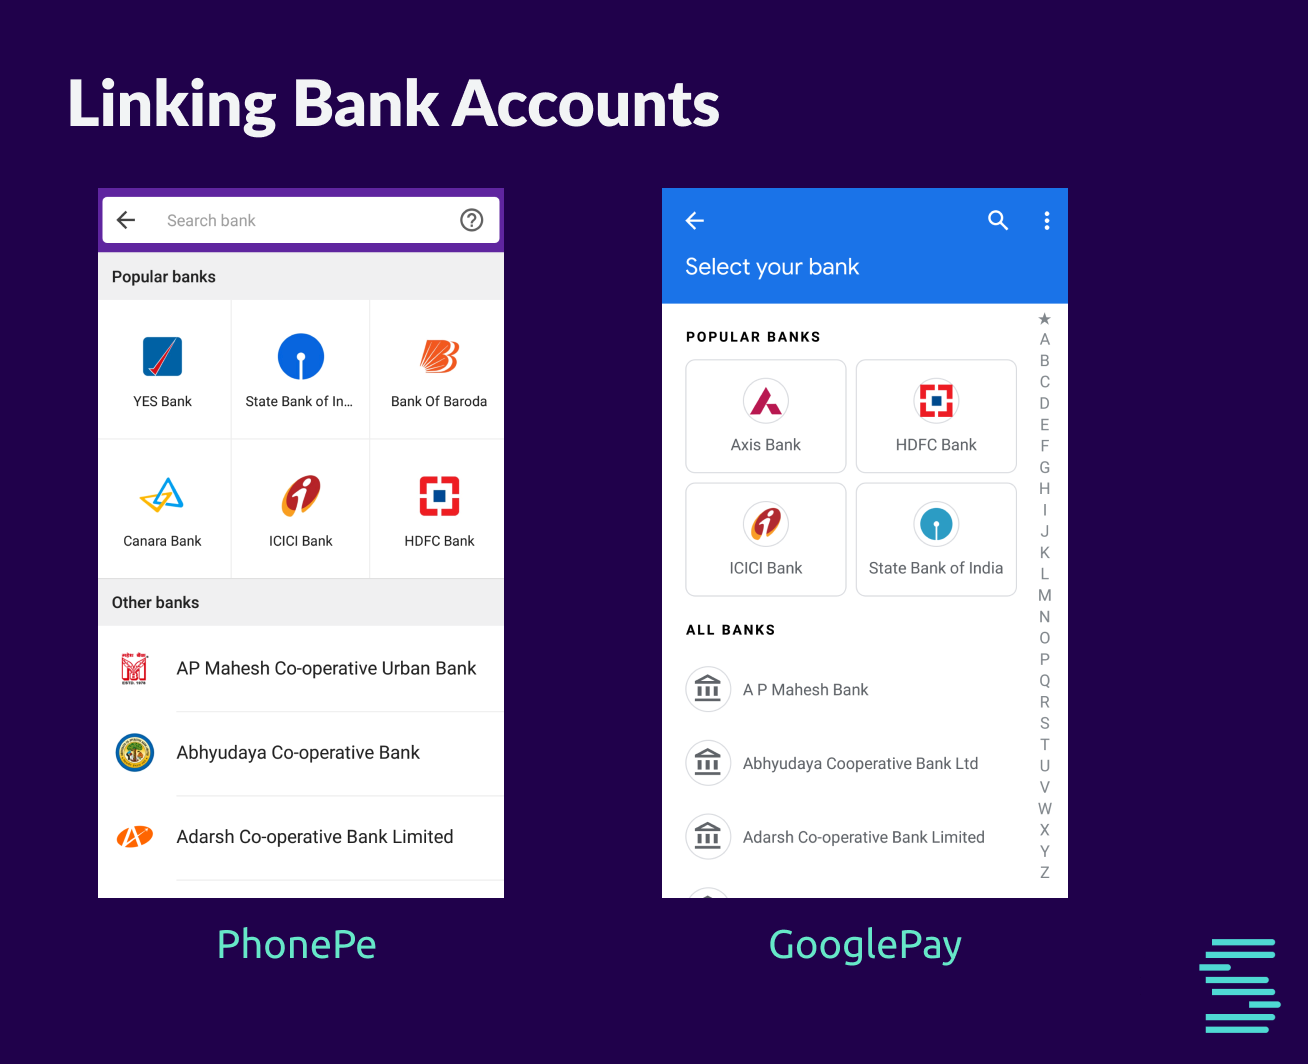
The next is to link the newly created UPI ID to a bank account. The list of all supported banks can be fetched from NPCI’s meta API listAccountProviders.
The user will be shown with all Banks supported by UPI. Currently, there are around 150 banks that support UPI.
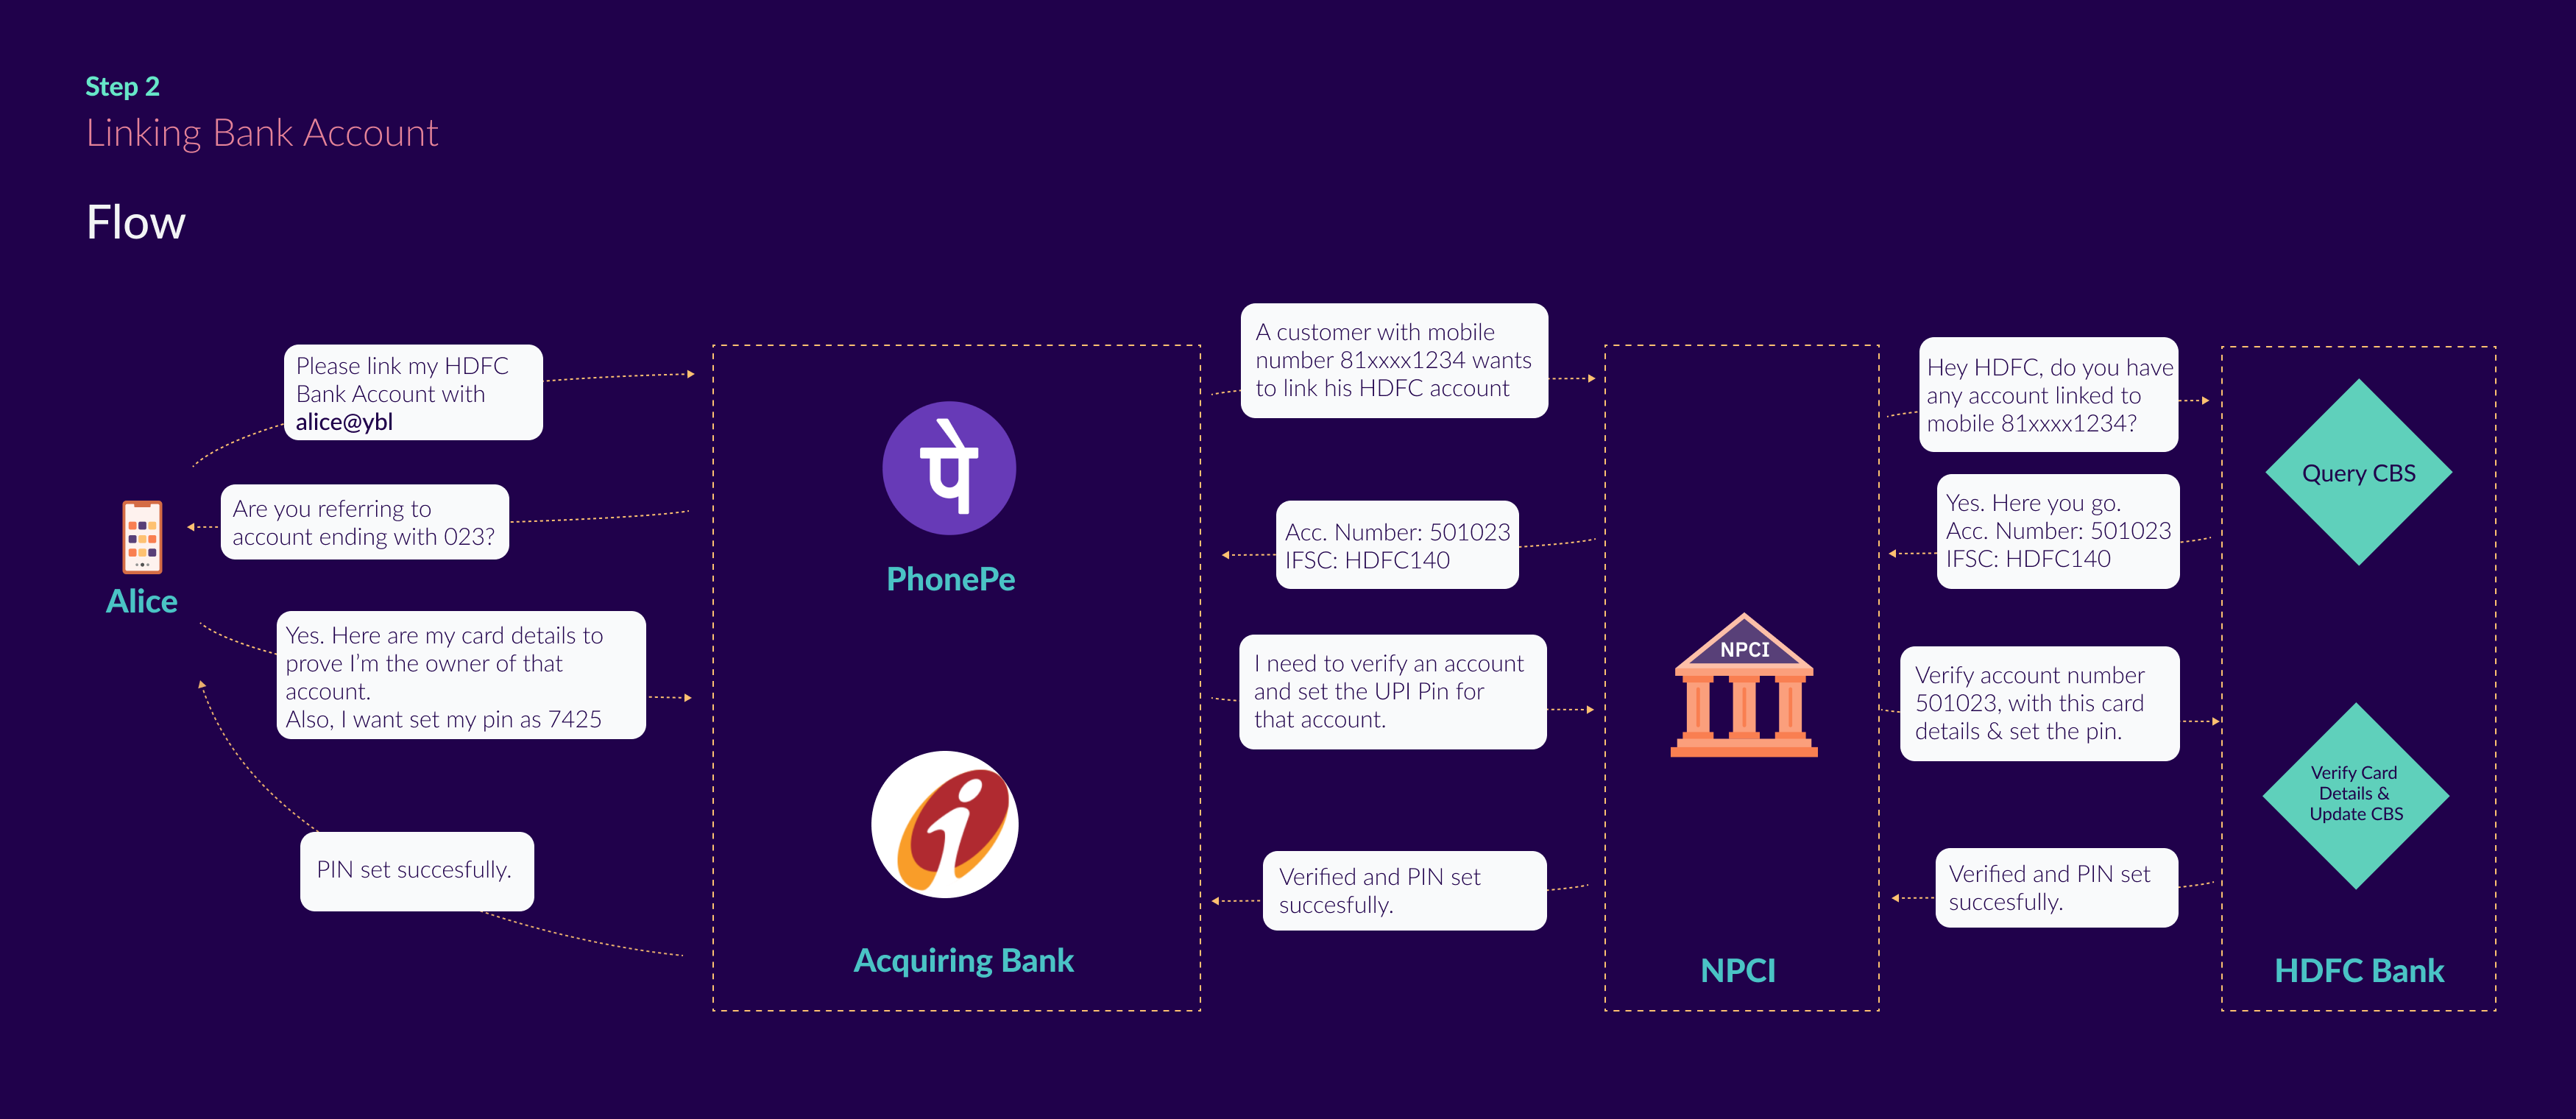
Once the user selects his bank account, the app makes a request called setCredentials to NPCI. Verification usually involves authentication of the user with the Issuing Bank by providing the card details and the PIN. If the user is authorized, the user can set a 4 digit or 6 digit UPI pin.
The UPI PIN acts as the knowledge factor in the 2-factor authentication.
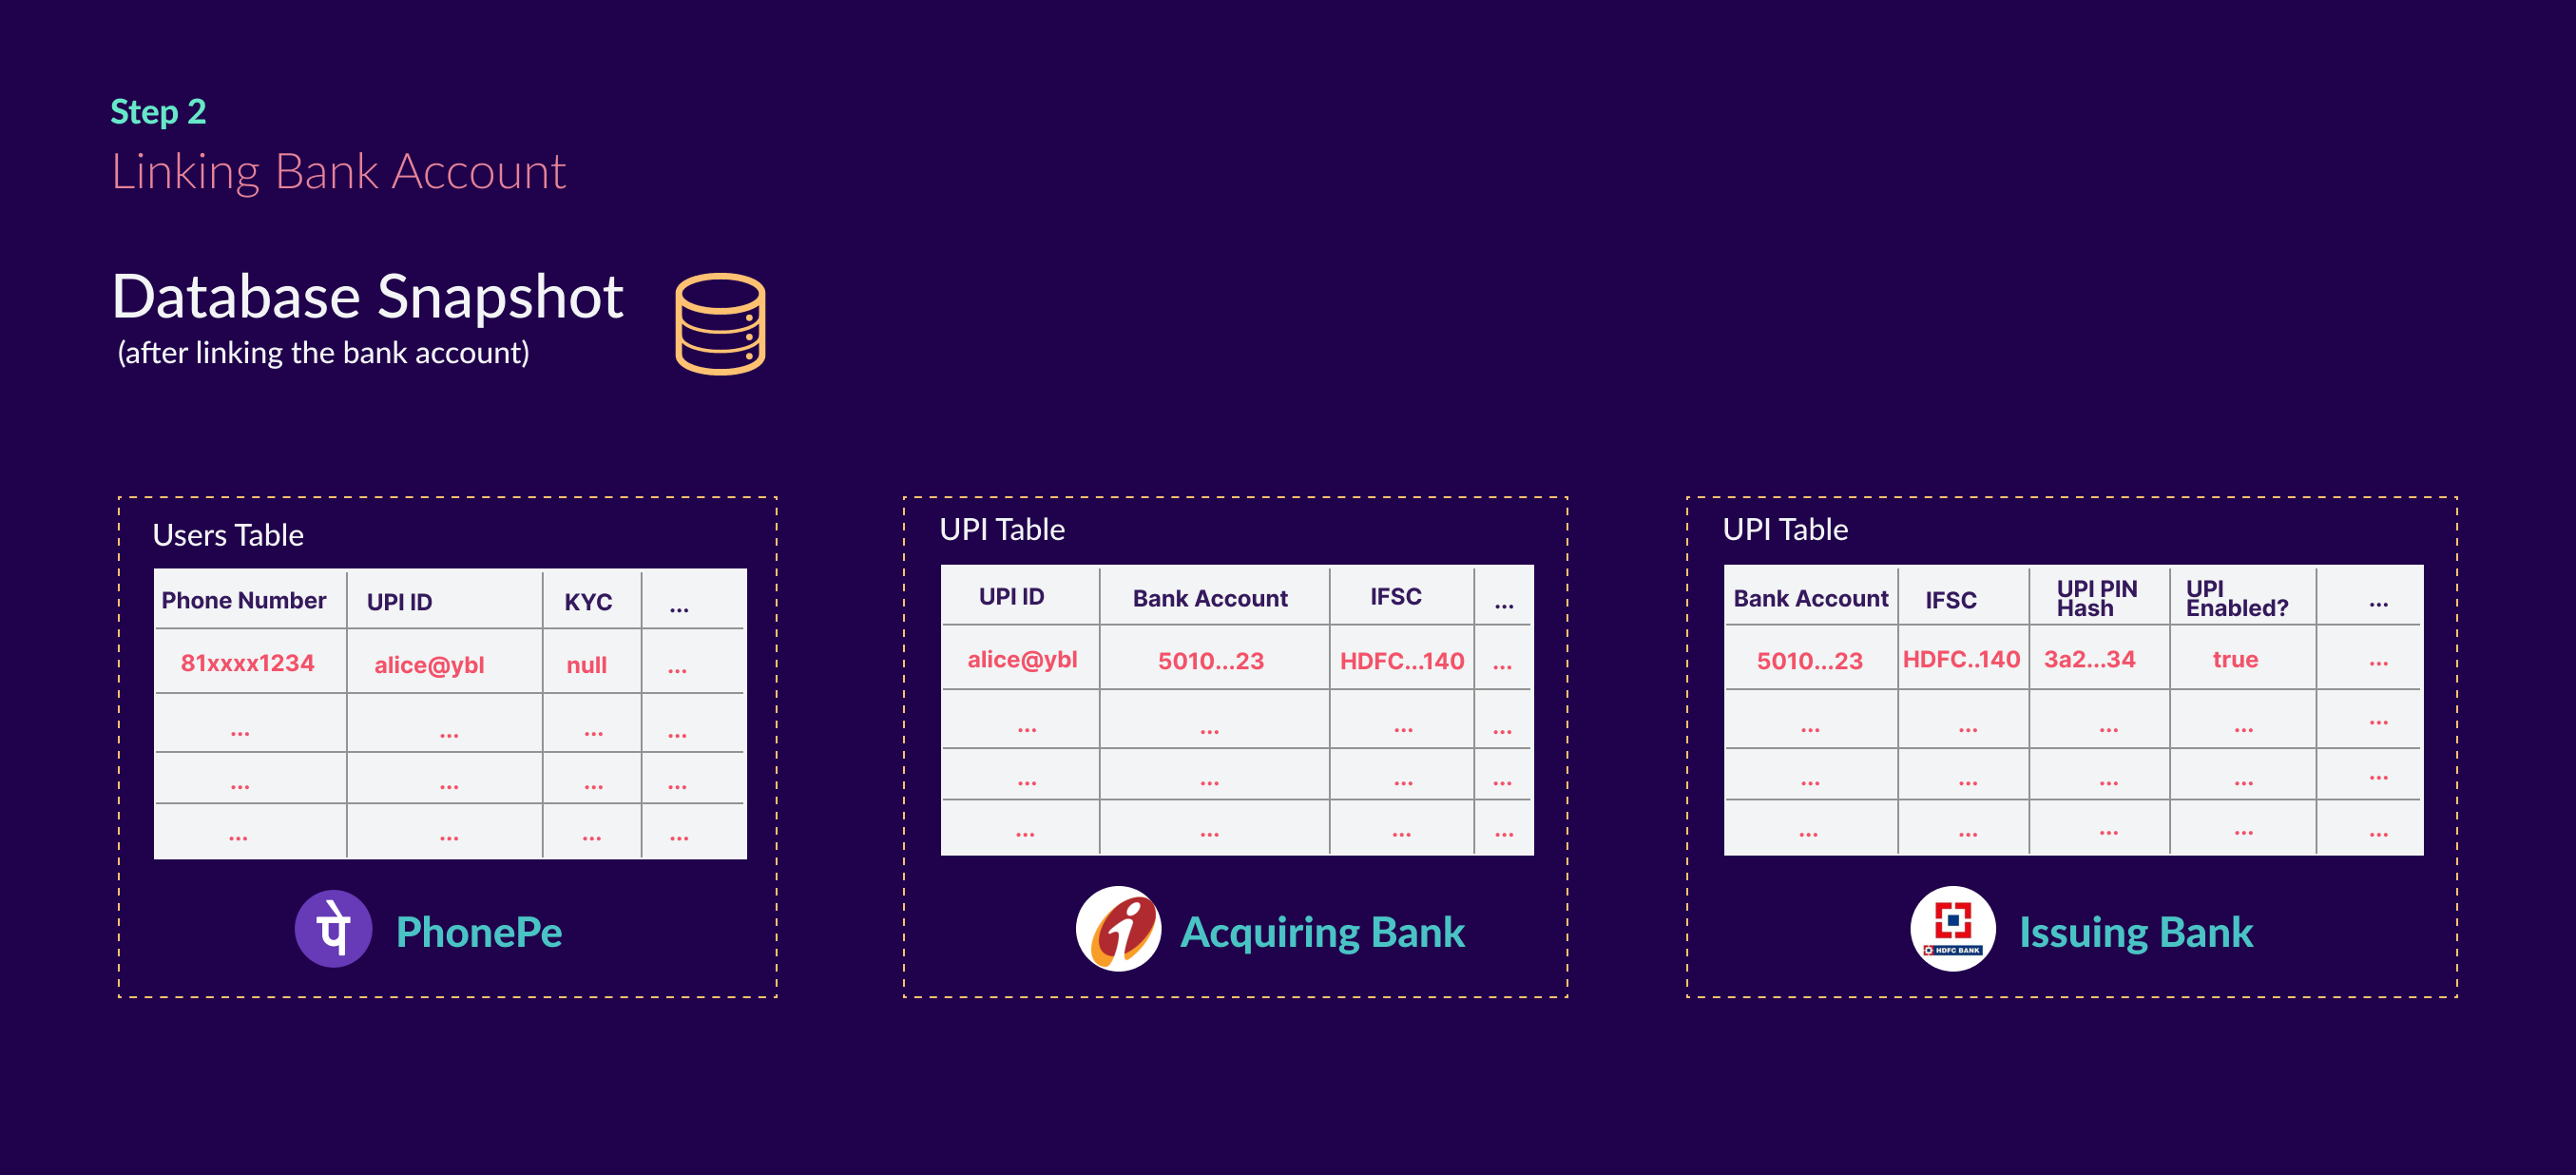
The Issuing Bank creates a salted hash of the PIN and stores the hash in the database. The UPI specification mandates the banks to not store PIN even in an encrypted form. It also mandates that the PIN has to be transported only in encrypted channels.
The Issuing Bank confirms that the account indeed is valid and returns the account information. Upon receiving the account information, the Acquiring Banks updates its database to map the newly created UPI to the received bank account information.
Let’s take an example of a user who uses PhonePe to connect to his HDFC bank account. PhonePe internally uses the ICICI bank to create and manage UPI IDs. In this case, since HDFC holds the money it is the Issuing Bank and since ICICI provides the UPI ID it is the Acquiring Bank.
At the end of registration, this is how the databases look across the Issuing Bank, Acquiring Bank, and the payment app.
The Life cycle#
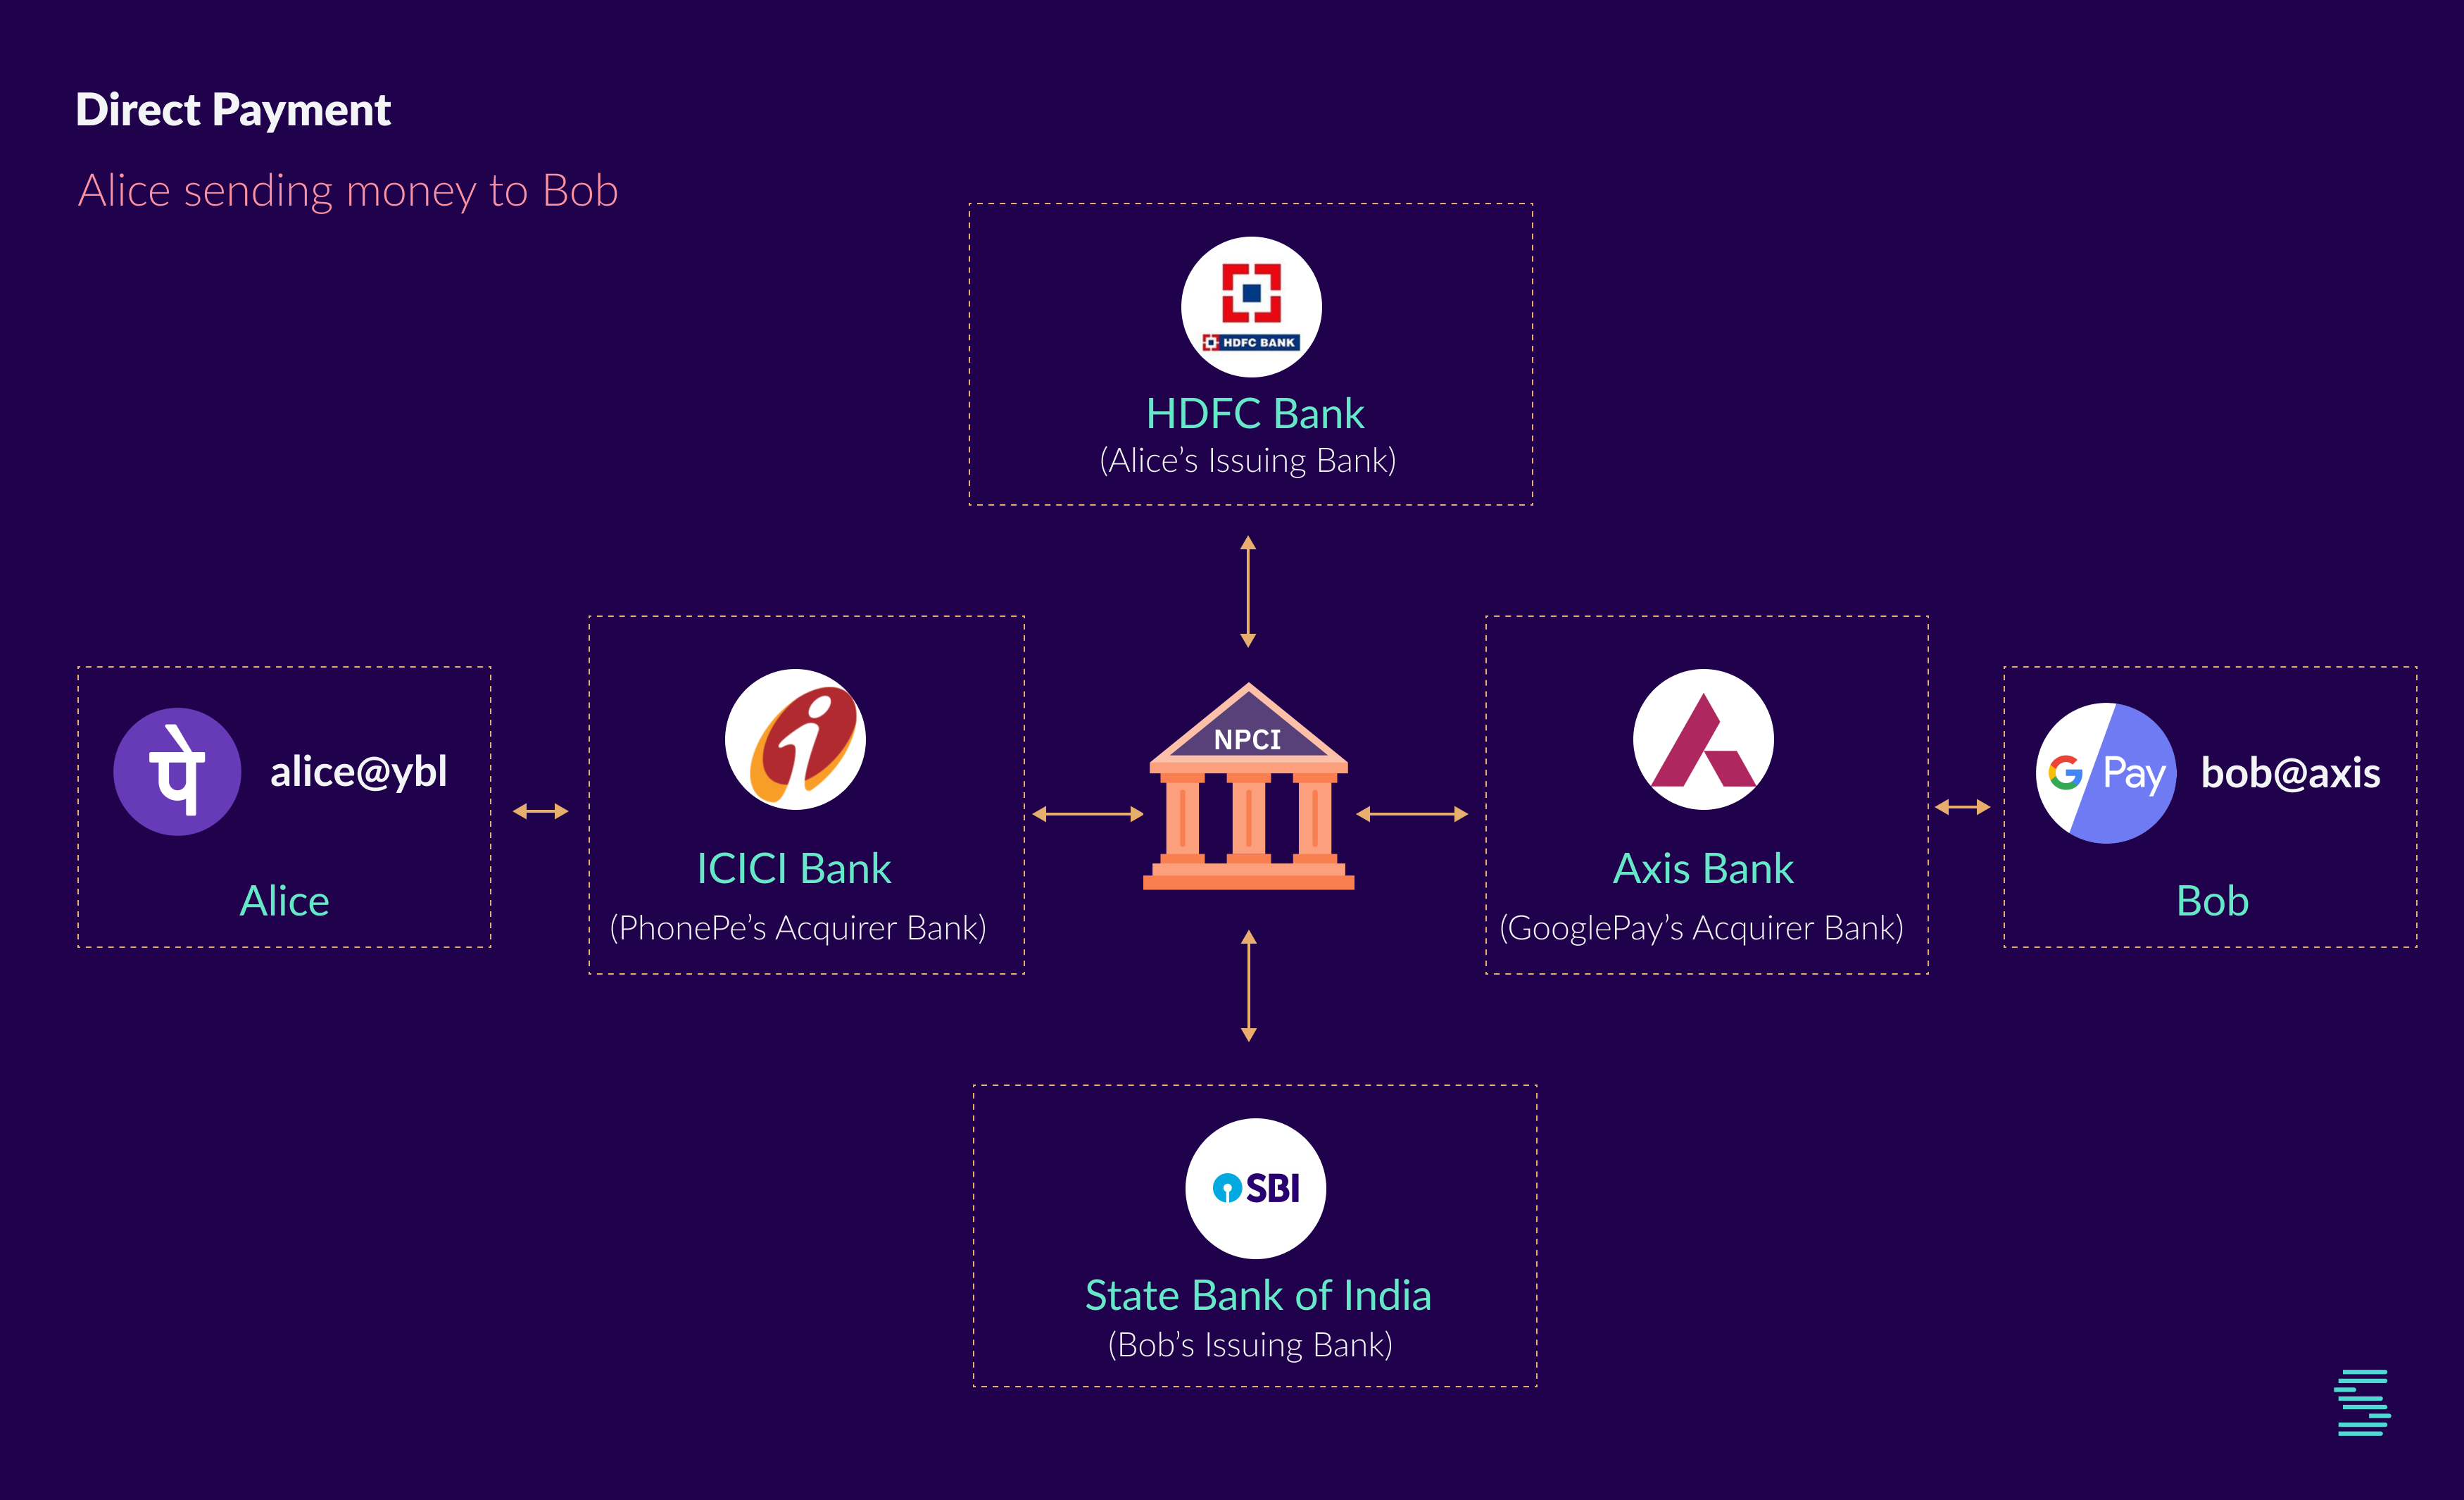
To understand how a transaction flows through the UPI infrastructure, let’s take an example of a direct payment and trace it from the beginning through the end.
Alice is using PhonePe connected to her HDFC Bank account. Her UPI VPA is alice@ybl. She wants to send money to Bob. Bob uses Google Pay with a UPI VPA bob@axis linked to his State Bank of India account.
Let’s quickly look at the setup.
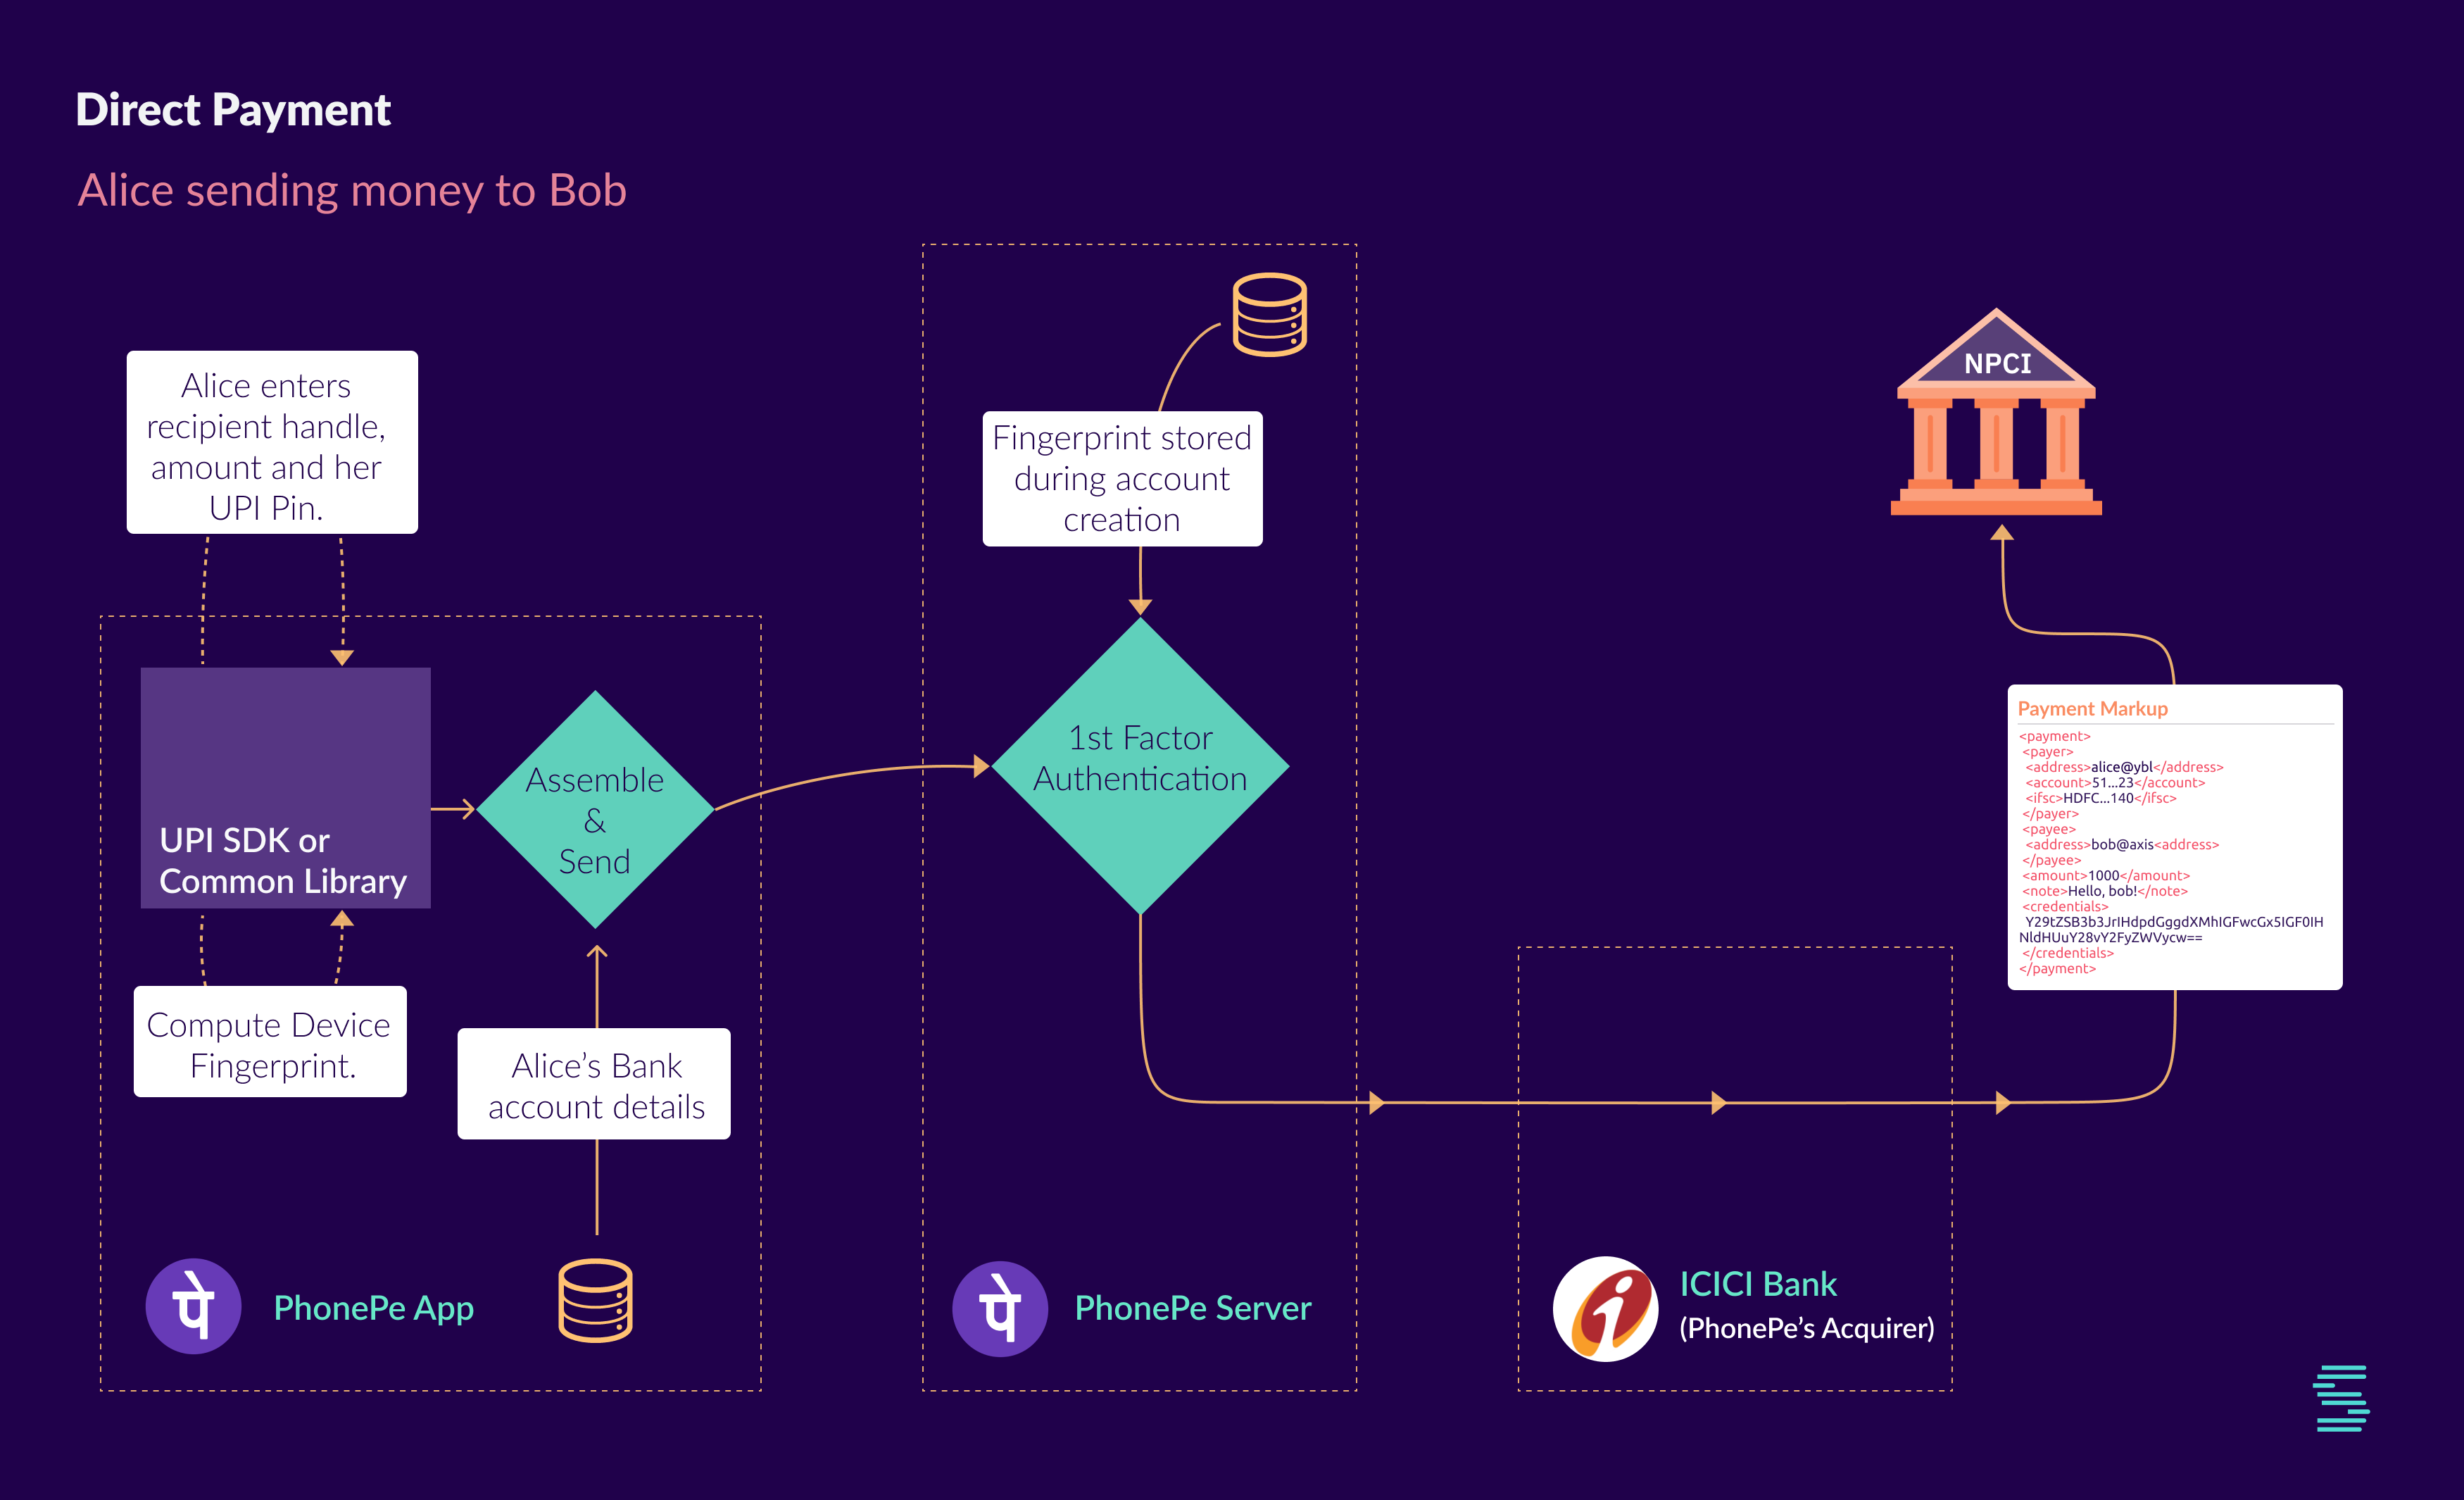
Alice enters Bob’s UPI ID and the amount she wants to send on her PhonePe app. PhonePe App invokes a method from the common library to collect and encrypt Alice’s UPI PIN. Next, it invokes another method to compute device fingerprint from scratch.
The app fills the rest of the parameters (for example her own bank account and IFSC code) and sends it to PhonePe servers.
The PhonePe server verifies the newly generated fingerprint with the fingerprint from the database and if the verification is successful, it forwards the request to NPCI via their acquiring bank ICICI.
NPCI needs the following to attempt processing of a payment
-
Authorization from Alice: To make sure that Alice really wants to send money to Bob.
-
Alice’s bank account number and IFSC: To debit the money from Alice’s account.
-
Bob’s bank account and IFSC: To credit the money into Bob’s account.
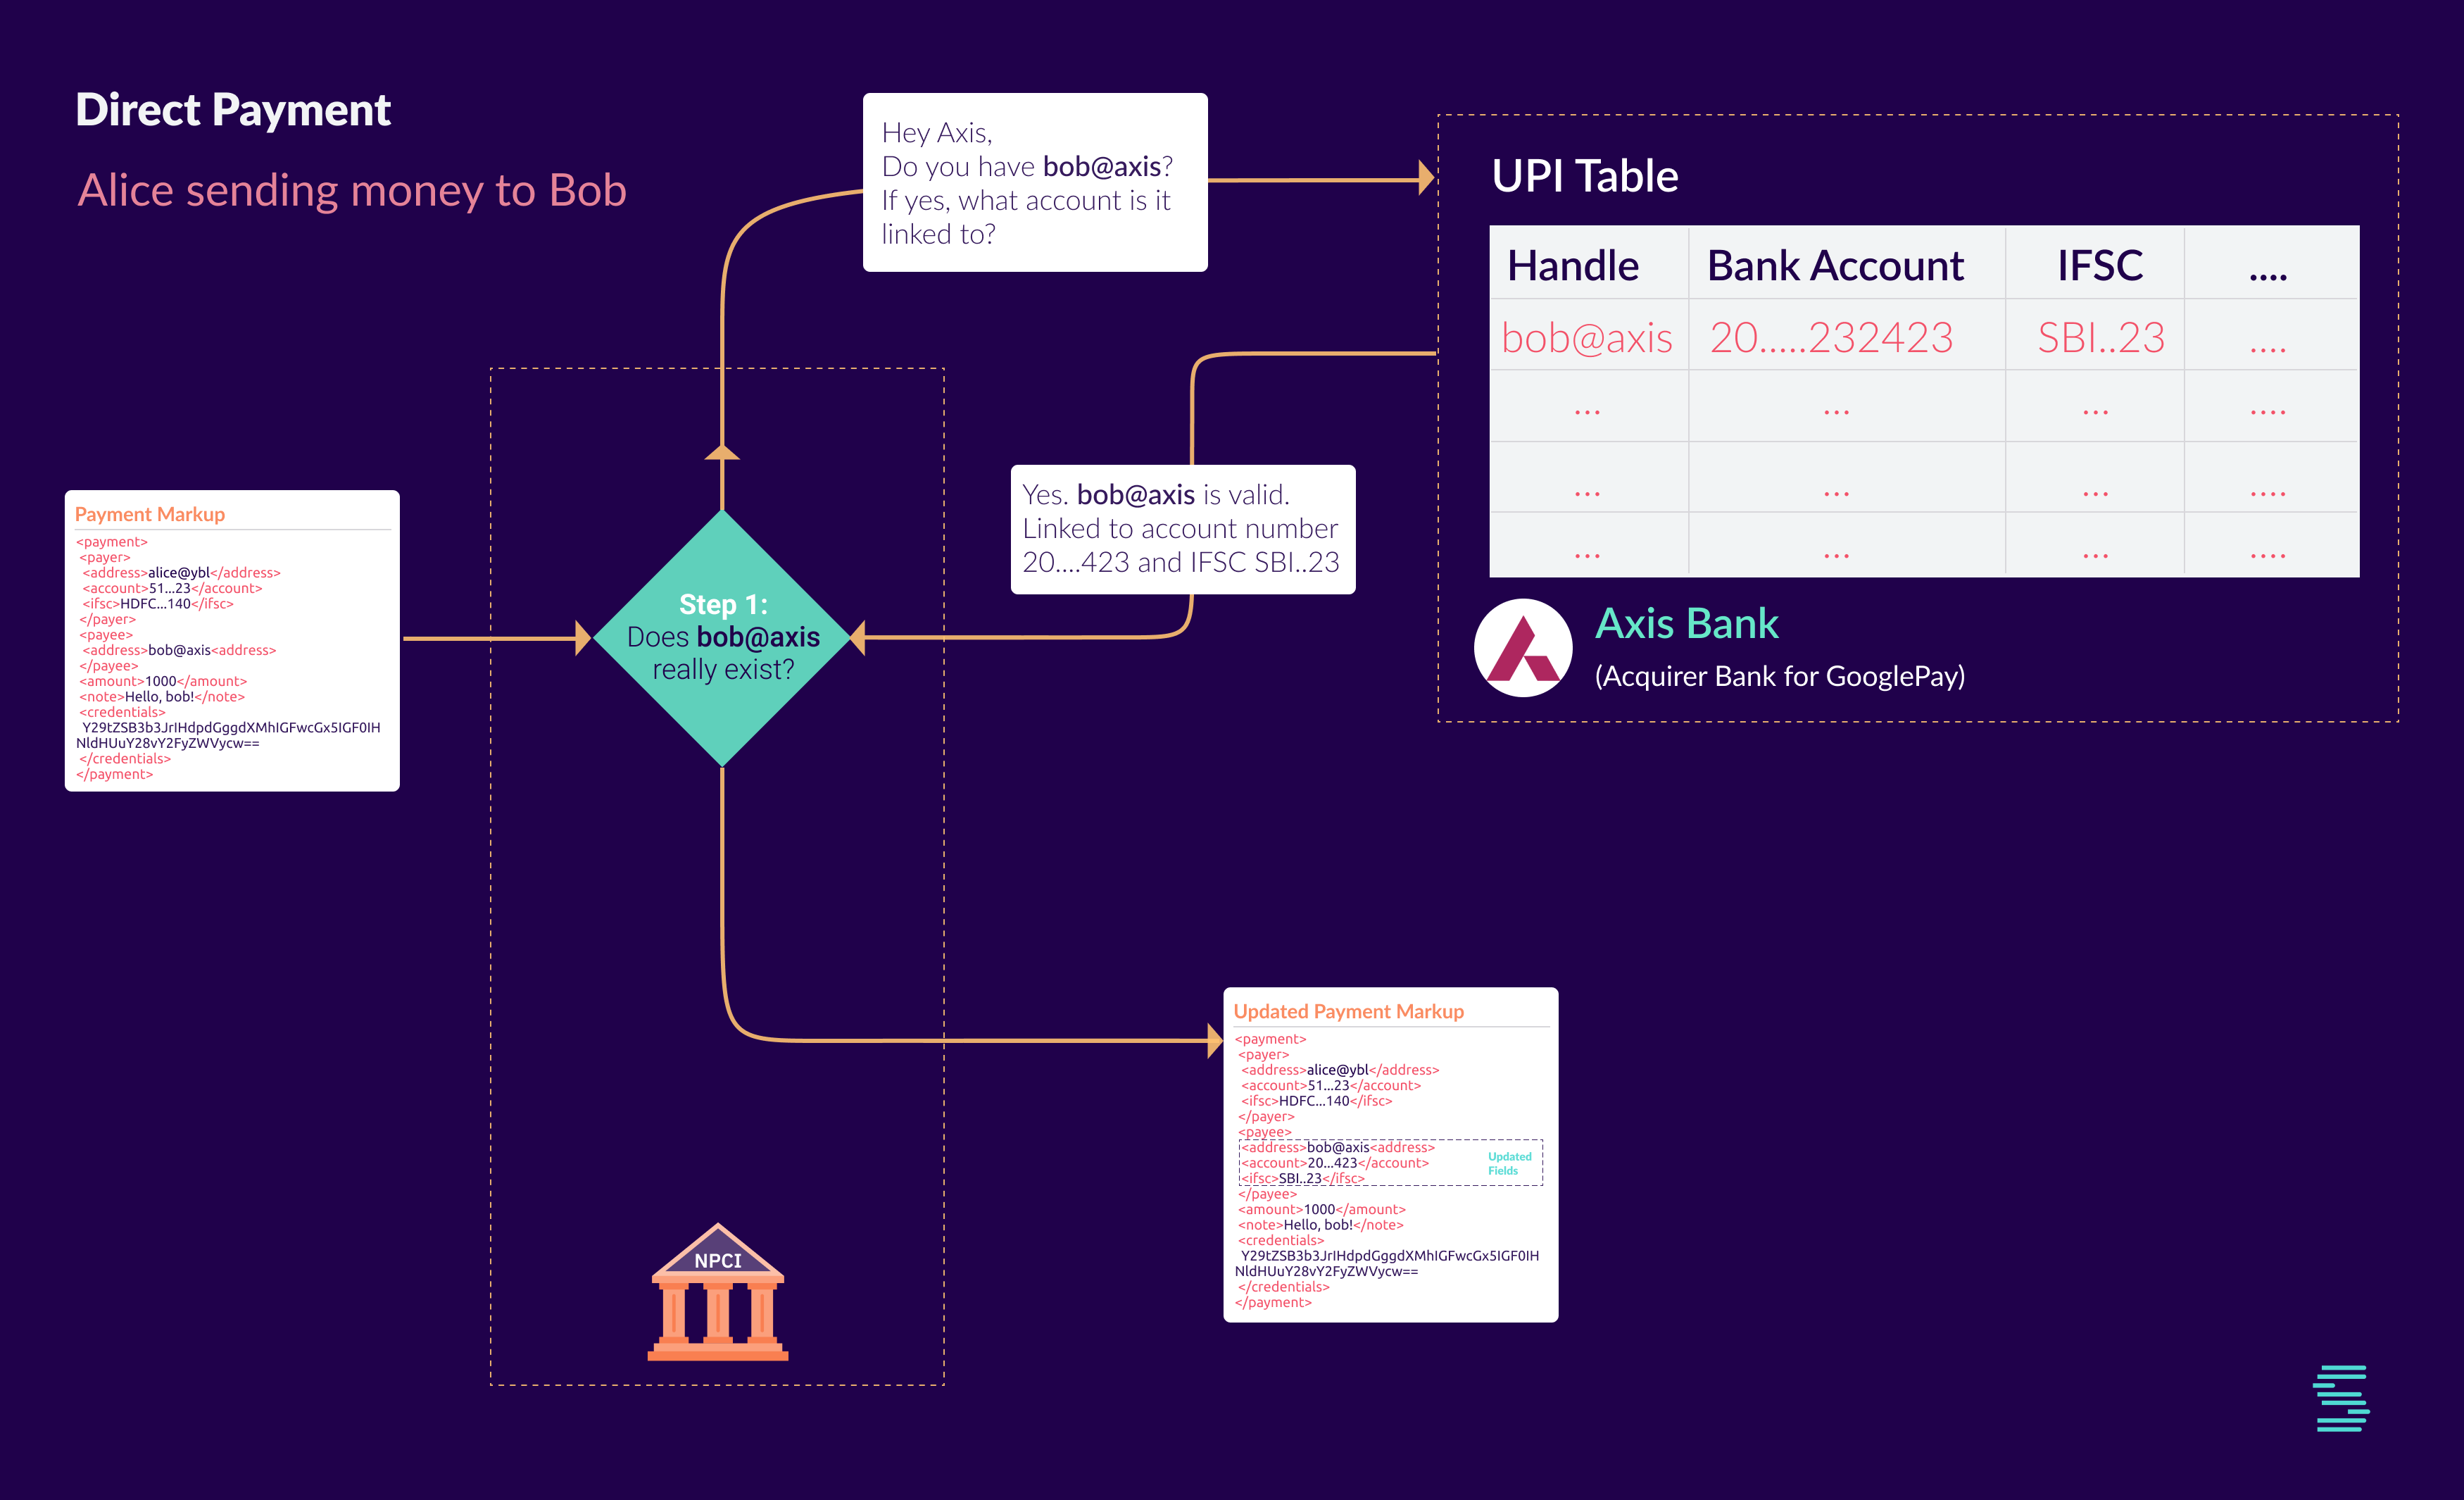
Out of the three things, it currently has two. It doesn’t have Bob’s account number and IFSC yet.
NPCI also needs to make sure that bob@axis exists and is linked to a bank account. That’s because UPI allows for transient payment addresses. Hence, the verification is mandatorily done so that we don’t end up in a situation where money gets debited from Alice’s account but no account to credit that money into.
NPCI consults the mapping of handles and their respective providers. It figures out that @axis is handled by Axis bank and requests for the address translation on bob@axis.
Axis bank checks its internal database to confirm that bob@axis exists and is linked to a bank account. It returns the bank account and IFSC to NPCI.
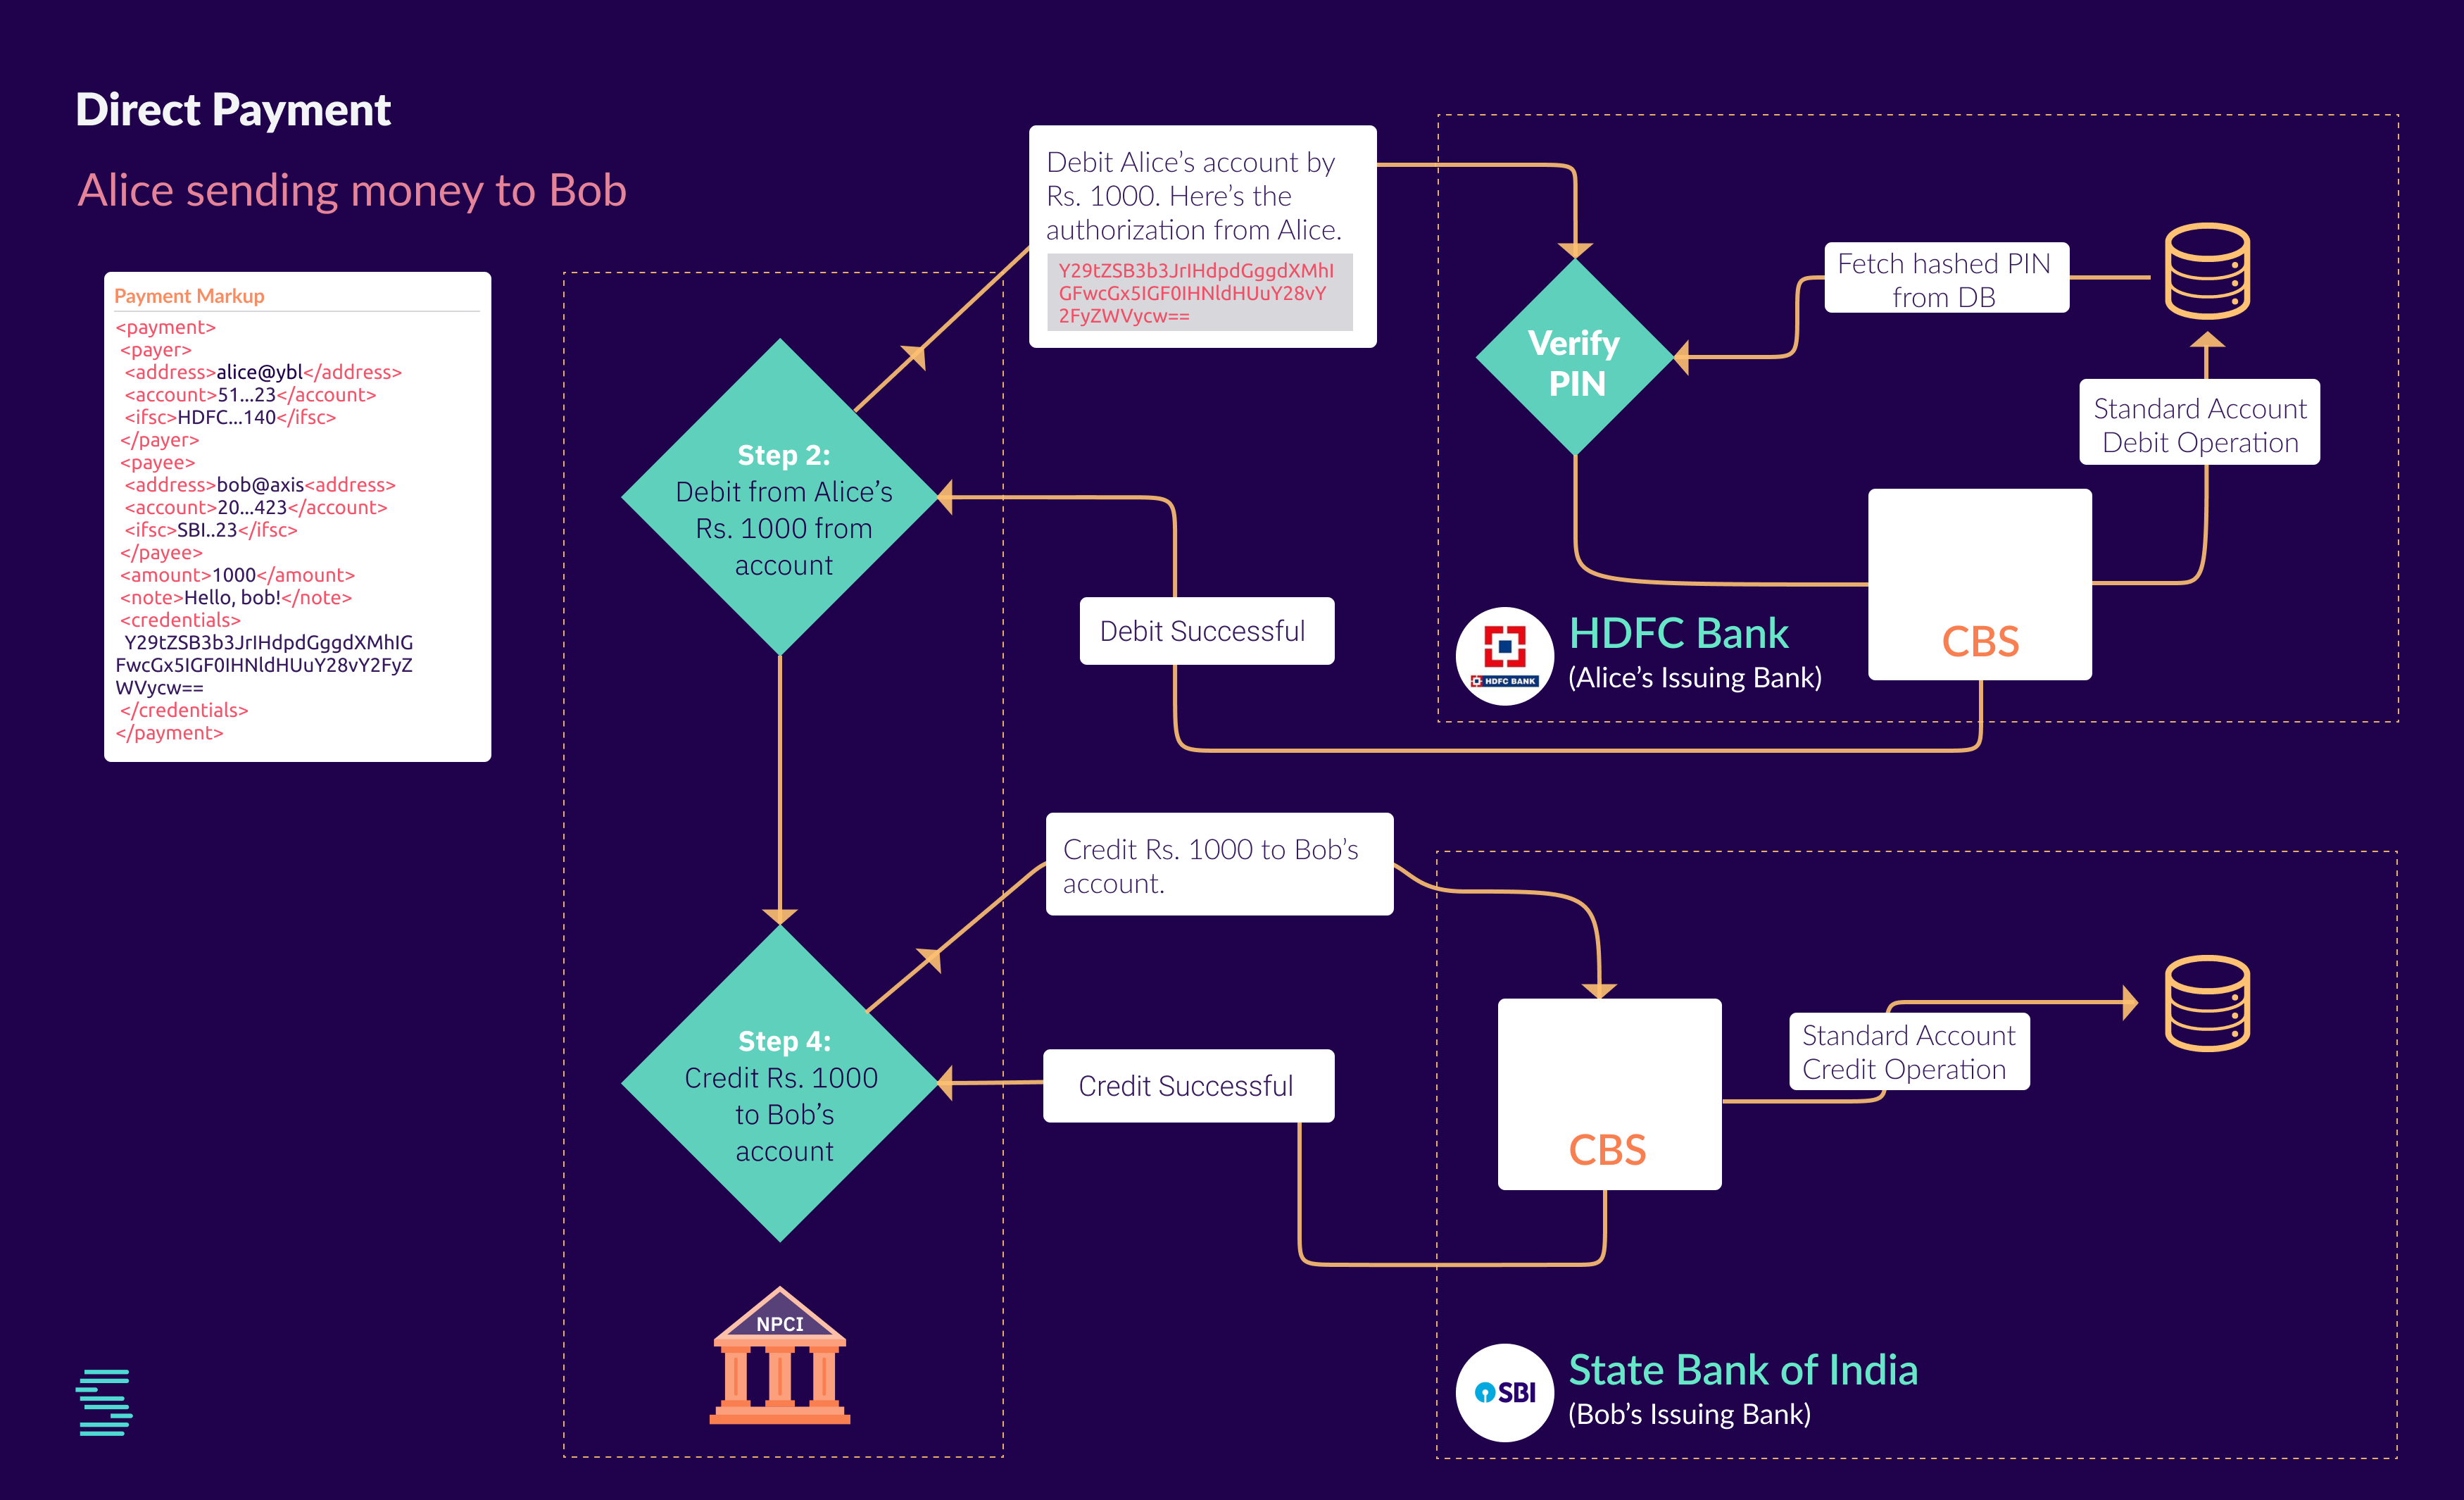
NPCI now has all the information to go ahead with the payment. It hands over the authorization to HDFC Bank to verify Alice’s PIN and debit her account by INR 1000. HDFC bank checks Alice’s digital signature and verifies the PIN with Alice’s PIN from its database.
It also runs other checks to see if Alice has enough money in her account to process payment or has she crossed her daily limit etc.
If everything works out in favor of Alice, HDFC bank debits Alice’s account and sends back the success response to NPCI.
NPCI’s job is now 50% complete. NPCI consults the mapping again to see where the money has to be credited. Bob’s account is with SBI. NPCI sends an instruction to SBI asking it to credit the money to Bob’s account.
Upon receiving a credit request, SBI can run some additional checks and will honor the request by issuing a credit to Bob’s account through their CBS. If everything works, it sends a success response back to NPCI.
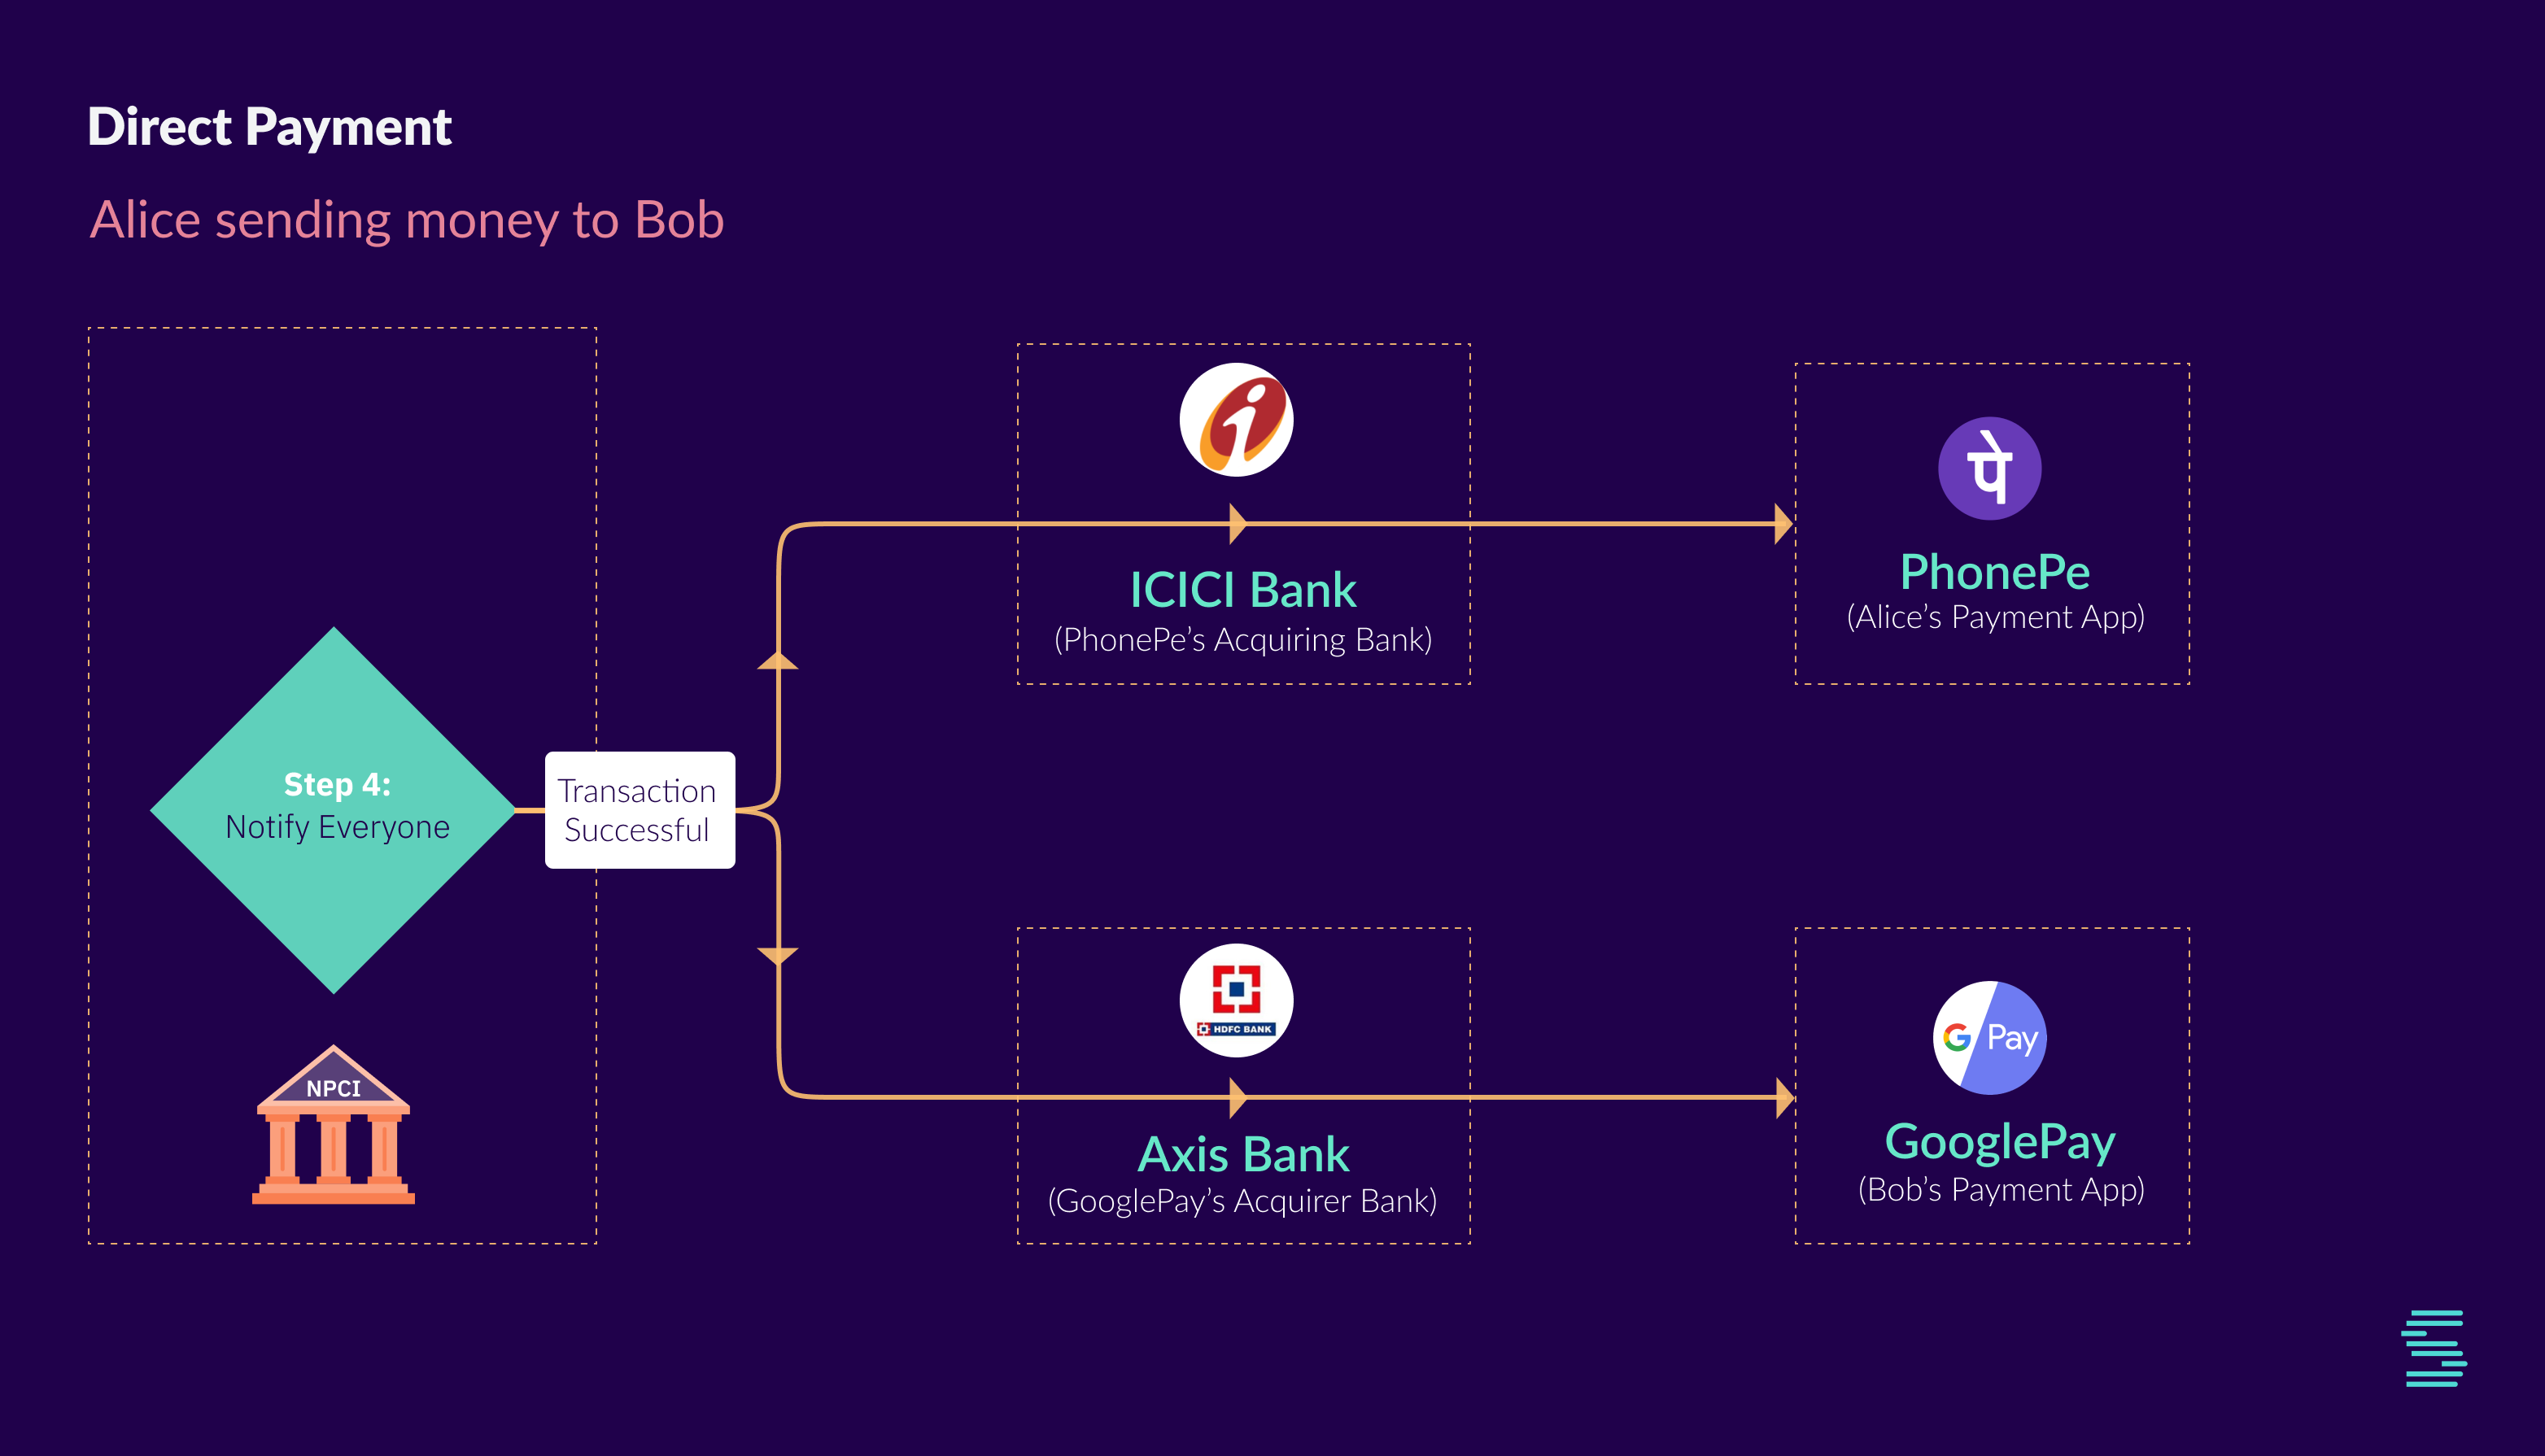
NPCI’s job is now almost complete. It notifies that transaction was successful to PhonePe (via ICICI bank) and to GooglePay (via Axis Bank). Both apps send out push notifications to notify the end-users.
The transaction is now complete. Bob can start using his money right away.
But wait, did my money really move?
We debited Alice’s account and credited that money to Bob’s account. But, the money didn’t exchange hands. The banks didn’t even exchange money.
We learned a lot in this part. Let’s wrap this part for now. We hope you enjoyed it.
Share it with the intellectually curious folks in your circle. If you have any questions regarding UPI or anything related to Fintech in general, feel free to post them on our forum.
In the next part of the series, we will understand how money actually changes hands.